Engineering recommendations version 1.2
Patrick (Pat) J. Hardock, P.Eng.
Senior Engineer—Natural Gas Measurement
Engineering and Laboratory Services Directorate
Measurement Canada
| Revision | Date | Description |
|---|---|---|
| 0.1 | 2008-03-05 | Original draft for consultation |
| 0.2 | 2008-03-05 | Picture format change for PDF |
| 1.0 | 2008-03-28 | Expanded scope, added new section 7.0, editorials and issue |
| 1.1 | 2008-04-09 | Editorials |
| 1.2 | 2008-06-19 | Editorials, updates to reflect Statistics team decisions regarding application of uncertainties, added figure 4. |
Table of contents
- 1.0 Scope
- 2.0 Introduction
- 3.0 Traditional correlation model
- 4.0 Gas Measuring apparatus containing reference meters
- 5.0 Traceability chain for reference meters contained in gas measuring apparatus
- 6.0 Traceability chain for gas measuring apparatuses containing rotary meters used for calibrating diaphragm meters or rotary meters
- 7.0 Traceability chain for gas measuring apparatuses containing sonic nozzles used for calibrating domestic ultrasonic meters
- 8.0 References
1.0 Scope
The purpose of this paper is to document and explain the existing traceability chains for the verification of domestic diaphragm and ultrasonic meters.
2.0 Introduction
The introduction of rotary meter based transfer provers and sonic nozzle provers has brought in to play the concept of prover containing reference standards for domestic meter verifications. This differs from the traditional correlation model which relies solely on the prover's ability to reproduce a pre-determined error value. Accordingly, certification procedures for gas measuring apparatuses can generally be divided among these two models. The first is, based on a set of methods and philosophies presented in the current bell prover specifications (LMB-EG-13) and sonic nozzle prover specifications (S-G-01-E), while the second is based on a series of documents referred to as certification requirements (GS-ENG) issued by Measurement Canada's Engineering and Laboratory Services.
3.0 Traditional correlation model
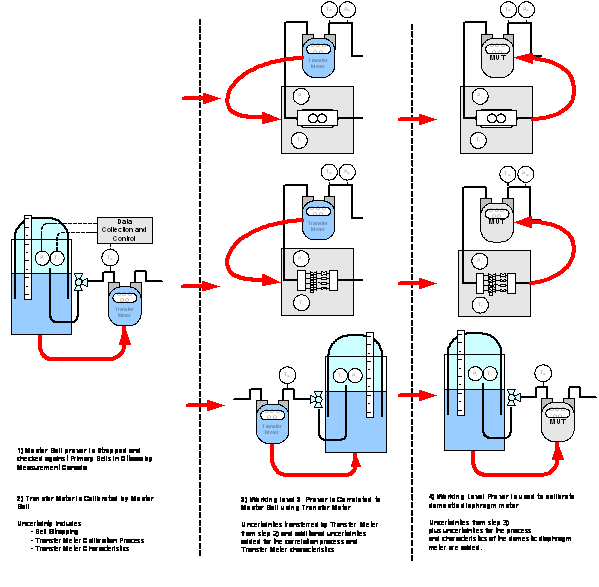
The traditional method of establishing traceability in the process of the calibration of domestic gas meters, depicted in Figure 1: Traceability through Direct Correlation for Domestic Meter Transfer, Sonic Nozzle and Bell Provers, involves the dissemination of the cubic foot from a local master bell prover to a number of concurrently located working level provers, done through use of transfer meters.
This process starts (Step 1 in Figure 1) with the dimensional determination of the local master bell prover's displaced volume. Referred to as Level 2 prover, the master bell prover's barrel is measured with a standard pi-tape which has been previously calibrated by the National Research Council of Canada (or in some cases another Measurement Canada recognized laboratory), having its traceability established to a "national standard". This process which is commonly referred to as "strapping", results in the determination of the prover's displaced volume with an uncertainty in the order of ± 0.08% at k=2.
It is important to note that this value, reported on the certificate of calibration, does not include contributors which reflect the usage of the prover, nor does it account for the uncertainties introduced by the bell travel, oil viscosity, bell use, or instrumentation associated with the bell. Accounting for these contributors typically adds in the order of ±0.2% to the pervious value. The estimation of the system uncertainty (Step 2), while being subject to Measurement Canada Engineering review and acceptance, is presently the responsibility of the owner / user of the prover. After August of this year the generation of a statement of uncertainty will become part of the Measurement Canada certification process. The responsibility will therefore be transferred to Measurement Canada's Gas Specialists. For the interim the statements will be subject to Measurement Canada Engineering review and acceptance. The responsibility Guidelines and recommendations for performing this task, along with standard spreadsheets to aid in this process, have been published by Measurement Canada.
The cubic foot value is then transferred by way of a comparison process (Step 3) from the single local (level 2) master bell to the working level provers (level 3) found throughout the meter shop, as described in other documents such as LMB-EG-13. This process is referred to as "volume correlation", and begins with the determination of the error of a set of transfer meters (usually similar in design to the domestic meters to be calibrated) using the master bell prover. The uncertainty of this process typically results in a value of ± 0.15 to 0.30% of the indicated volume on the transfer meter.
The error values are then compared to those determined using the working level sonic nozzle prover, bell prover, or domestic meter transfer prover. If the differences between the values are significant, the information is used to determine a series of corrections which, when applied to the calibration results of domestic gas meters, traces the result back to the pi-tapes owned by Measurement Canada (Ottawa).
The working level (level 3) prover is then used to evaluate the performance of domestic meters prior to them being placed in service (Step 4 in figure1). As the calibration process for the domestic meter mirrors that of the previously conduced transfer meter correlation, the uncertainty of the process becomes primarily a function of the prover's short-term reproducibility and temperature stability, and the repeatability of the transfer meter and the domestic meter under evaluation. Although the working level bell prover has itself been strapped at one point in its history, this value is not considered in the estimation of the uncertainty of the process.
This model only holds true when the conditions set out in the previously referenced specifications are met. The result is a measurement uncertainty in the order of ± 0.25 to 0.45% for the domestic meter.
Figure 1: Traceability through direct correlation for domestic meter transfer, sonic nozzle and bell provers

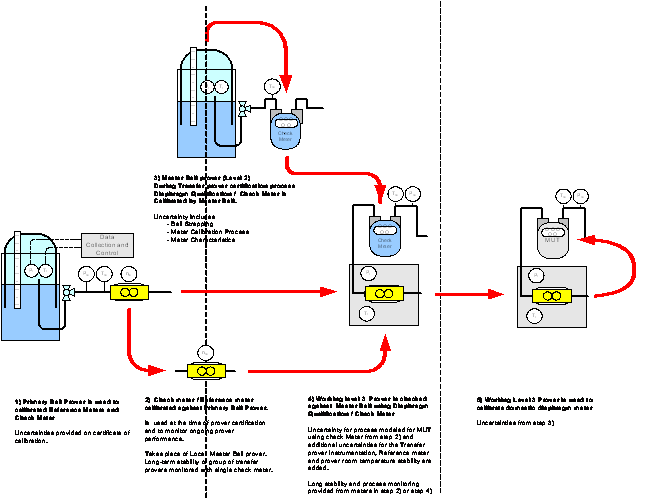
Figure 2: Traceability of domestic meter transfer provers containing reference meters

4.0 Gas measuring apparatus containing reference meters
As previously mentioned, the second category of traceability is consistent with a series of documents GS-ENG) referred to as 'Certification Requirements', which are issued by Measurement Canada's Engineering and Laboratory Services. For a complete list of these documents refer to section 8 of this recommendation or to the Measurement Canada - Certification Requirements and Recommended Practices section located on Measurement Canada's website. These documents outline the requirements to be met in order for a certificate of calibration to be issued for a measuring apparatus. These documents also contain recommended procedures for the determination of measurement uncertainty in common types of calibration equipment. Again, the estimation of the system uncertainty, while being subject to Measurement Canada review and acceptance, is presently the responsibility of the owner / user of the prover. A standard spreadsheet is available from Measurement Canada to aid in this process.
Somewhat like the first case, the process starts (Step 1 in Figure 2) with the dimensional determination of a bell prover volume. In this figure the prover is the Primary Bell Prover located in Ottawa, however other alternative traceability chains are acceptable. (Refer to the section 5.0 of this document.)
Of importance is that a primary (Level 1) bell prover is used to calibrate a precision reference meter that in turn will be used as a reference standard inside of the domestic meter transfer prover or measuring apparatus. A certificate of calibration for the reference meter indicating an uncertainty not greater than ± 0.3% at k=2 is provided. This prover is also used to calibrate a check standard or check meter (Step 2 in Figure 2). The purpose of this meter is two fold; firstly, it can be used as a local volumetric standard having the same status and performing some of the same functions as the local master bell and secondly, it is used to monitor the performance of the transfer prover over time.
It should be noted however that this does not negate the need for diaphragm qualification meters (Step 3 of Figure 2). Here the purpose is generally, not to transfer the value of the cubic foot from the "Local" Master Bell prover" but rather to be used to verify that the prover is capable of calibrating the particular type of diaphragm meter.
This process begins with the determination of the error of a set of diaphragm qualification meters (usually similar in design to the domestic meters to be calibrated) using the master bell prover. The uncertainty of this process typically results in a value of ± 0.15 to 0.30% of the indicated volume on the qualification meter.
The error values are then compared to those determined using the domestic meter transfer prover. If the differences between the values are significant, the information is used to determine a series of corrections.
This process is also used to estimate the type A uncertainty associated with each type of diaphragm meter for application in Step 5. (Refer to GS-ENG-07-06 for details.)
The working level (level 3) prover is then used to evaluate the performance of domestic meters prior to them being placed in service (Step 5). The uncertainty of the process becomes primarily a function of the reference meter's calibration, temperature stability, and the repeatability of the meter under test (MUT) previously evaluated using the qualification meters.
5.0 Traceability chain for reference meters contained in gas measuring apparatus
The majority of the processes used to evaluate the performance of trade meters rely on a direct comparison to a reference meter. These include the calibration of large diaphragm meters, rotary meters and low and high pressure turbine meter calibration, to name a few. In each of these cases the reference meter is removed from the measuring apparatus or facility and then calibrated in relation to a higher level standard. These standards may be other reference meters, bell provers, pipe provers or a gravimetric weighing system. In any case, in order for the measuring apparatus to be recognized or legally traceable in Canada, the reference meters are required to be calibrated either by Measurement Canada or a facility that has been listed in Measurement Canada's Bulletin G-16, Recognition of Test Data From Gas Meter Test Facilities.
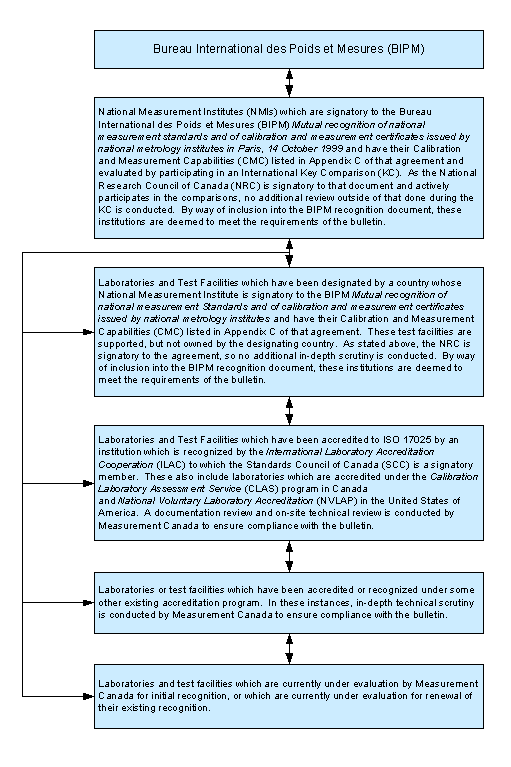
Facilities which are listed in Bulletin G-16 have undergone a technical review and have been audited to sections 5.3 to 5.10 of ISO/IEC 17025:2005 General Requirements for the Competence of Testing and Calibration Laboratories. The bulletin summarizes the capabilities of each test facility, or the meters they are able to calibrate, and the associated traceability chains and measurement uncertainties. The document also outlines the international agreements and accreditation programs under which the data will be accepted. The hierarchy of laboratories and international agreements is shown in Figure 4: Traceability of approval and Calibration test data from Measurement Canada Bulletin G-16.
Once a reference meter has been calibrated, the data and statements of measurement uncertainty are reviewed by Measurement Canada's Engineering and Laboratory Services Directorate (ELSD). If the information is consistent with the requirements of Bulletin G-16 and other related documents, a certificate of calibration will be issued permitting the use of the reference meter in a measuring apparatus.
The uncertainty of the reference meter is dependent on the capability of the facility and the method chosen for the calibration, however a certificate will not be issued for reference meters with uncertainties greater than ± 0.3% at k=2.
6.0 Traceability chain for gas measuring apparatuses containing rotary meters used for calibrating diaphragm meters or rotary meters
In the case of rotary meter provers used for the purpose of verifying diaphragm meters, an examination of the two available methods described in sections 3.0 and 4.0 of this recommendation reveals no great compelling technical reason to choose one method over the next. Experience has shown that comparable uncertainties are attainable using both traceability paths. Typical values result in an uncertainty of ±0.3% at k=2. The choice of the method used in each meter shop typically becomes a factor of process integration and labor utilization.
7.0 Traceability chain for gas measuring apparatuses containing sonic nozzles used for calibrating domestic ultrasonic meters
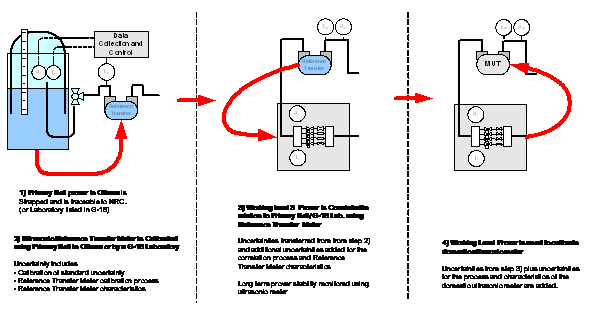
The current versions of the specifications for Working Level Sonic Nozzle Provers (S-G-01) and for level 2 and 3 bell provers (LMB-EG-13) were written specifically to address the verification of domestic diaphragm meters following the Traditional Correlation Model. In order to calibrate domestic ultrasonic meters following the traditional bell prover and local master bell prover traceability chain, each prover in the chain requires the installation of additional instrumentation to allow for the digital communication between the meter and the provers. As an alternative to modifying the local master bell provers, the traceability chain depicted in Figure 3 has been realized. This process simply replaces the local master bell prover from the traceability chain in Figures 1 with the Primary bell prover located at Measurement Canada's Laboratory in Ottawa or a primary level prover located in a facility listed in Bulletin G-16. Once calibrated, the reference transfer meters are then shipped to the meter shop whereupon the correlation process is conducted as per the referenced specification (S-G-01).
Figure 3: Traceability through in-direct correlation for domestic ultrasonic meters

Although the resulting uncertainty values mirror that of the traditional correlation process, the process is not only dependent on the reference transfer meter being accurate and repeatability, but more importantly also depends on the long-term reproducibility of the reference transfer meter being significantly smaller than those used in the traditional process. In order to address this issue the performance of the reference/transfer meter is monitored in the meter shop on a regular basis. By way of using statistical process control methods, the long-term variability, process drift and reproducibility are also monitored.
Figure 4: Traceability of calibration and approval data from Measurement Canada bulletin G-16

8.0 References
- LMB-EG-13: Provisional Specifications for the Calibration and Use of Gas Measuring Apparatus—Bell Provers, 1989,
- S-G-01: Specifications for the Calibration, Certification and Use of Gas Measuring Apparatus - Working Level Sonic Nozzle Provers, 2001,
- S-S-02: Measurement Uncertainty and Meter Conformity Evaluation Specification, 2007,
- GS-ENG-03-06: Certification of Gas Measuring Apparatuses Containing Rotary Meters Used for The Purpose of Calibrating Diaphragm Meters, 2007,
- GS-ENG-04-01: The Calibration and Certification of Gas Measuring Apparatus—Atmospheric Pressure Turbine Meter Proving Systems, 2004,
- GS-ENG-04-06: Guidelines for The Determination of Measurement Uncertainty In Automated Master Bell Provers, 2007,
- GS-ENG-06-02: Engineering Instructions for the Determination of Measurement Uncertainty for Two Meter Comparisons Using Numerical Analysis Software, 2006,
- GS-ENG-07-02: Temperature and Humidity Measurements in Prover Rooms, 2007,
- GS-ENG-07-03: Administrative Process for the Certification of Non-Standard Measuring Apparatuses, 2007,
- GS-ENG-07-06: Determination of Short-term Repeatability and Long-term Reproducibility of Bell Provers Using Diaphragm Transfer Meters
- Bulletin GEN-09: Measurement Canada General Bulletin: Delegation of Authorities
- Bulletin G-16: Recognition of Test Data from Gas Meter Test Facilities, Measurement Canada, 2007,
- Guide to the Expression of Uncertainty in Measurement (GUM) ISO, 1993,
- ISO/IEC 17025:2005 General Requirements for the Competence of Testing and Calibration of Laboratories, 2005.
